Home
Categories
Dictionary
Glossary
Download
Project Details
Changes Log
What Links Here
FAQ
License
Scripted UA tutorial from start
1 Overview
1.1 UA Application tutorial architecture
1.2 Services definition
1.3 Types definition
1.4 Applications definition
2 Specify the PublishModule
2.1 Script the PublishModule in groovy
2.2 Specify the bridge between the PublishModule and its implementation
3 Specifying the Definition File
4 Developing the User Application
5 Setting the User Application configuration
6 See also
This tutorial is the same as the Scripted UA tutorial, but without having to do the UA tutorial first.
In this tutorial, we will learn about developing a Scripted UA. We will reuse the groovy tutorial, and replace the Java User application by a Groovy Script.
And two application each with one module:
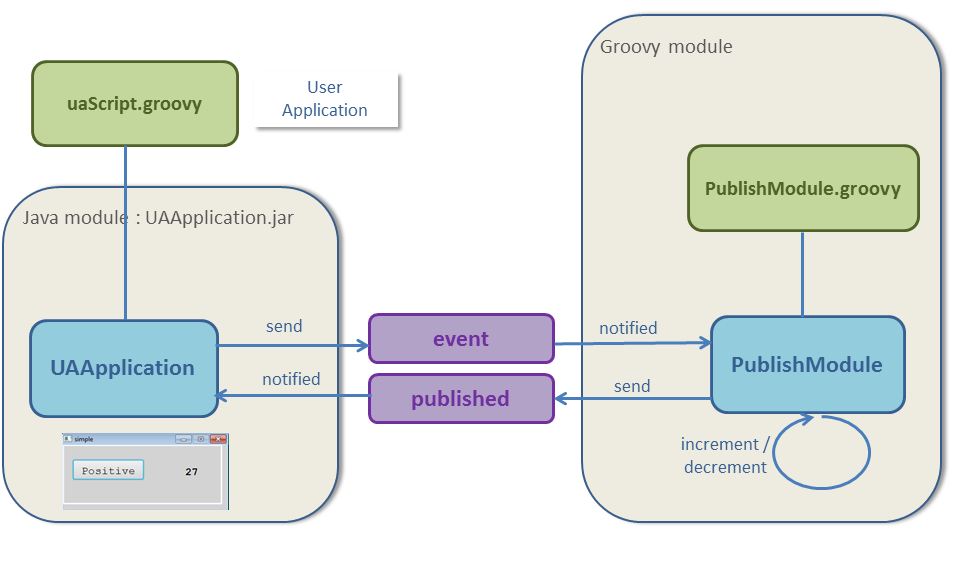
The architecture is:
We will also specify the Windowing Configuration (in our case, we will only have one Window):
In this tutorial, we will learn about developing a Scripted UA. We will reuse the groovy tutorial, and replace the Java User application by a Groovy Script.
Overview
UA Application tutorial architecture
We have two services:- One Service publish a value
- Another Service publish the state of a toggle button in case of a click event
And two application each with one module:
- The first
PublishModule, which: - Increment or decrement the value
- Publish cyclically the value
- Listen to the toggle event to set if the value should increment or decrement
- The second
EventModule, which: - Subscribe to the published value and show this value
- Show a toggle and sends an event when the user clicks on this toggle
- Our
EventModulewill be an UA application scripted in groovy - Our
PublishModulewill be an application scripted in groovy
The architecture is:
Services definition
We define our two services in aservices.xml XML file:- The
eventservice carries the state of the toggle button. It is an event Service because the service should only be invoked when the state of the toggle button changes - The
publishedservice carries the value. It is a publish Service because the service should be invoked cyclically
      <services>
         <event name="event" id="1" >
            <data name="event" type="bool" />
         </event>
         <publish name="published" id="2" >
            <data name="value" type="int" />
         </publish>
      </services>
Types definition
These two services use a very simple types definition. There are only two types:- The
booltype is a boolean - The
inttype is an int
types.xml XML file:<types> <simpleType name="bool" baseType="boolean" /> <simpleType name="int" baseType="int" /> </types>
Applications definition
We define our two applications in anapplications.xml XML file:- The
eventApplionly contains theEventModule. This Module: - sends the
eventservice - subscribes to the
publishedservice - The
publishApplionly contains thePublishModule. This Module is coded in groovy and: - sends cyclically the
publishedservice - subscribes to the
eventservice
         <applications>
            <application name="eventAppli" id="1">
               <deployment>
                  <lib url="UAApplication.jar" />
               </deployment>
               <modules>
                  <module name="EventModule" id="1" >
                     <interfaces>
                        <eventSend service="event" attach="attach"/>
                        <subscribe service="published" />
                     </interfaces>
                  </module>
               </modules>
            </application>
            <application name="publishAppli" id="2">
               <modules>
                 <groovyModule name="PublishModule" id="1" >
                   <interfaces>
                     <eventReceived service="event"/>
                     <cyclic service="published" frequency="200ms" attach="attach"/>
                   </interfaces>
                 </groovyModule>
               </modules>
            </application>
         </applications>
For now we did not bridge our services to any implementation for our two applications. This will be done in the next step.
Specify the PublishModule
Script the PublishModule in groovy
The PublishModule:- sends cyclically the
publishedservice - subscribes to the
eventservice
published service to be invoked cyclically every 200 milliseconds in the module XML specification:<cyclic service="published" frequency="200ms" attach="attach"/>We will create a
publish.groovy script to implement the behavior of this Module:- a
subscribemethod will be notified of theeventService. Depending on the value of theeventdata, astepvariable will have a 1 or -1 value - a
publishmethod will be invoked cyclically for thepublishedService. The current value will be incremented or decremented, and the Service will be notified with this current value
      int step = 1;
      int count = 1;

      public void subscribe(ServiceInstance service) {
        boolean evt = service.getData("event").getValueAsBoolean();
        if (evt) {
          step = -1;
        } else {
          step = 1;
        }
      }

      public void publish(ServiceInstance service) {
        service.setDataIntValue("value", count);
        count += step;
        service.invoke();
      }
Specify the bridge between the PublishModule and its implementation
Now that we have coded thePublishModule, we must specify in the applications.xml XML file the bridge between this module and its implementation:- The groovy script which implements the
PublishModule
      <application name="publishAppli" id="2">
         <modules>
            <groovyModule name="PublishModule" id="1" >
               <groovyImplementation path="publish.groovy" >
                  <defaultSendEntryPoint method="publish" />
               </groovyImplementation>
               <interfaces>
                  <eventReceived service="event"/>
                  <cyclic service="published" frequency="200ms" attach="attach"/>
               </interfaces>
            </groovyModule>
         </modules>
      </application>
Specifying the Definition File
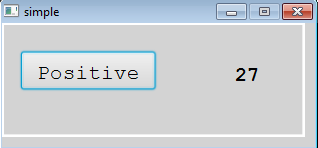
The Definition File will contain:- One ToggleButton
- One Label
We will also specify the Windowing Configuration (in our case, we will only have one Window):
      <cockpit>
         <DFFiles>
            <df path="tutorial.xml" />
         </DFFiles>
         <windows>
            <windowDef name="Window" width="8000" height="3000" x="0" y="0" />
         </windows>
         <configs border="255,255,255" borderWidth="3">
            <display id="1" name="simple" width="8000" height="3000" defaultLayout="1">
               <layout name="layout" id="1">
                  <window name="Window">
                     <layer layerID="1" />
                  </window>
               </layout>
            </display>
         </configs>
      </cockpit>
Now we will specify the ARINC 661 configuration for both the ARINC 661 Client and the ARINC 661 Server:
      graphics=DefGraphics.xml
      ui=LookAndFeel.xml
      pictures=DefPictures.xml
      lf=JavaFX
      supplement=6
      warnForUndefAttrs=false
      serverInputPort=8080
      serverOutputPort=8081
      serverInputSize=50000
      serverOutputSize=200
      server.autoVisible=true
      logServerArea=true
      windowManager=windows
      server.windows=tutorialWindow.xml
      server.computeLayerSize=false
      server.menus=true
      server.uiCombo=true
      maximumQueueSize=50
The result will be:
Developing the User Application
Our User Application will be coded in Groovy: Now we will develop our User Application:- The
init()method will be used to add the listener which will listen to the click on the ToggleButton and invoke the event Service - The
subscribe(ServiceInstance)method will be fired when the User Application module is notified from thepublishService
      int LAYER = 1;
      int TOGGLE_BUTTON = 1;
      int LABEL = 2;
      SendEventServiceInstance eventService = null;

      public void init() {
        this.eventService = (SendEventServiceInstance) context.getModule().getService("event");
        // listen to widgets events
        api.addWidgetEventListener(LAYER, TOGGLE_BUTTON, new ARINCEventListener() {
          public void eventReceived(ARINCEvent evt) {
            WidgetEvent widgetEvt = (WidgetEvent) evt;
            try {
              boolean isSelected = ((Boolean) widgetEvt.getValues().get(0));
              eventService.setDataBooleanValue("event", isSelected);
              eventService.invoke();
            } catch (ARINCRuntimeException ex) {
              context.error(ex.getMessage());
            }
          }
        });
      }

      public void subscribe(ServiceInstance service) {
        if (helper.hasChanged("value")) {
          String value = helper.getStringValue("value");
          api.setWidgetParameter(LAYER, LABEL, ARINC661.A661_STRING, value);
          api.sendAll();
        }
      }
Setting the User Application configuration
Now we will need to specify the properties of the UA application:<properties> <application name="uaappli" > <module name="uaappli" > <moduleProperty key="script" value="uaScript.groovy" /> <moduleProperty key="a661Config" value="a661/tutorial.properties" /> <moduleProperty key="includeServer" value="true" /> </module> </application> </properties>
See also
- Built-in Applications: This article present the built-in Applications distributed with the framework
- Scripted UA tutorial: This article is a tutorial about developing a Scripted User Application (UA)
- UA application: The built-in UA application allows to execute an ARINC 661 Client
- Developing a Scripted UA: This article explains how to develop a Scripted User Application
×
![]()
Categories: builtin-applis | tutorials | uaappli