Home
Categories
Dictionary
Glossary
Download
Project Details
Changes Log
What Links Here
FAQ
License
Python tutorial
1 Overview
2 Architecture
3 XML configuration
3.1 Filelist configuration
3.2 Using an Anaconda Python runtime
3.3 Applications definition
4 Generating the Python library
5 Code the PublishModule in python
6 See also
2 Architecture
3 XML configuration
3.1 Filelist configuration
3.2 Using an Anaconda Python runtime
3.3 Applications definition
4 Generating the Python library
5 Code the PublishModule in python
6 See also
The first tutorial presented the coding and configuration of a very simple system with two modules. In this Python tutorial, one of the modules will be reimplemented in the Python scripting language, using UDP sockets.
Note that the second python tutorial will show how to use the start EntryPoint in Python.
We will reimplement the
As for the first tutorial, we don't have to bother about how to send cyclically the value, because we already specified that we wanted the
Note that the second python tutorial will show how to use the start EntryPoint in Python.
Overview
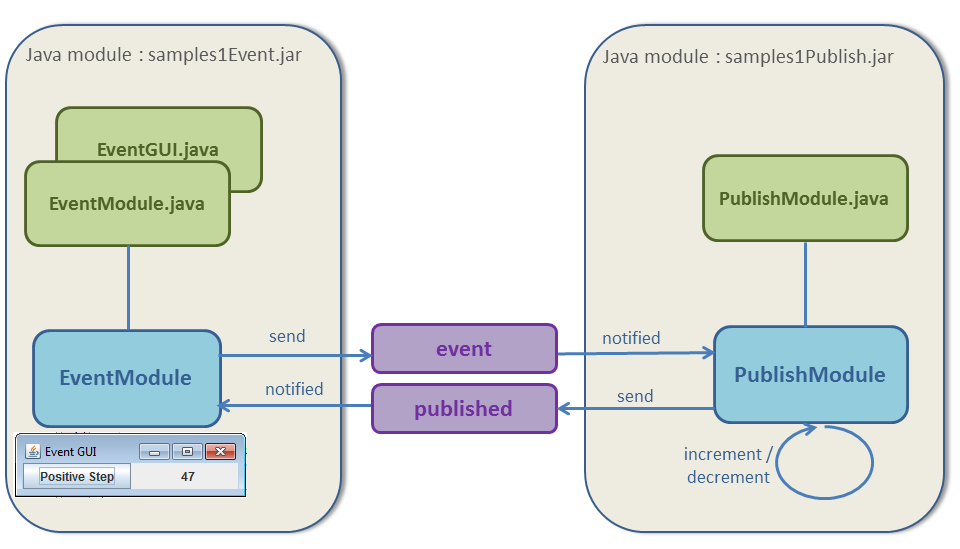
In the first tutorial, we had two modules, both of which implemented in Java:- The
PublishModulemodule increments or decrements a value cyclically - The
EventModulemodule allows to click on a toggle to set if the first module should increment or decrement the value, and shows the value
PublishModule in the Python scripting language.
Architecture
The first tutorial had two applications coded in Java:- The first
PublishModulewhich: - Increment or decrement the value
- Publish cyclically the value
- Listen to the toggle event to set if the value should increment or decrement
- The second
EventModulewhich: - Subscribe to the published value and show this value
- Show a toggle and sends an event when the user clicks on this toggle
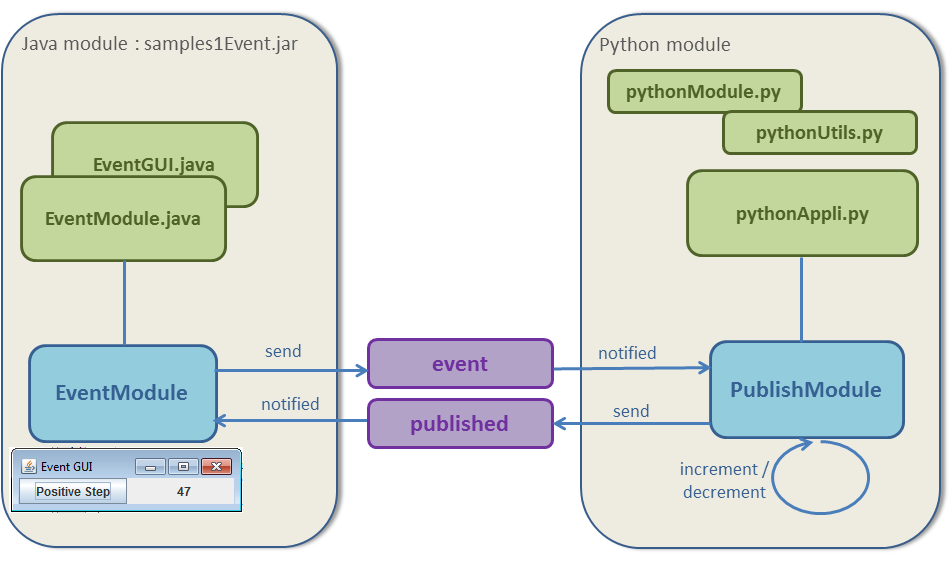
We will reimplement the
PublishModule in Python:
XML configuration
Only theapplications.xml XML file has to be modified to switch from a Java module implementation to a Python module implementation.
Filelist configuration
We will define the path of the Python runtime in the filelist configuration:<files> <file url="applications.xml" /> <file url="services.xml" /> <file url="types.xml" /> <pythonRuntime path="<my_python_path>/python.exe" /> </files>If we want to simplify debugging if we encounter errors in the script execution, we can set the
debugScripts property:<files> <file url="applications.xml" /> <file url="services.xml" /> <file url="types.xml" /> <property key="debugScripts" value="true" /> <pythonRuntime path="<my_python_path>/python.exe" /> </files>
Using an Anaconda Python runtime
If we want to use an Anaconda Python runtime, we can specify:<files> <file url="applications.xml" /> <file url="services.xml" /> <file url="types.xml" /> <property key="debugScripts" value="true" /> <pythonRuntime path="<my_Anaconda_path>/python.exe" anaconda="true" /> </files>
Applications definition
We will change theapplications.xml XML file, by modifying the PublishModule configuration:<application name="publishAppli"> <modules> <pythonModule name="PublishModule" > <pythonImplementation path="pythonAppli"> <defaultSendEntryPoint method="publish" /> </pythonImplementation> <interfaces> <eventReceived service="event"/> <cyclic service="published" frequency="200ms" attach="attach"/> </interfaces> </pythonModule> </modules> </application>As you can see, we specified that the implementation of the
PublishModule is in the pythonApply.py file, in the same directory as the application.xml file. We will also have a send method in the Groovy script will be called each time the published Service is cyclically invoked.
Generating the Python library
We will generate the two following scripts by the Browser:- The
pythonModule.pyscript - The
pythonUtils.pyscript
Code the PublishModule in python
The Python code is different of the Java code used for the first tutorial because of the difference between Java and Python syntax.As for the first tutorial, we don't have to bother about how to send cyclically the value, because we already specified that we wanted the
published service to be invoked cyclically every 200 milliseconds in the module XML specification:<cyclic service="published" frequency="200ms" attach="attach"/>The
pythonApply.py script will implement the behavior of this Module:- a
subscribemethod will be notified of theeventService. Depending on the value of theeventdata, astepvariable will have a 1 or -1 value - a
sendmethod will be invoked cyclically for thepublishedService. The current value will be incremented or decremented, and the Service will be notified with this current value
      from pythonUtils import PythonUtils

      class PythonAppli:
        step = 1
        count = 1

        def subscribe(self, pythonUtils, serviceName):
          eventService = pythonUtils.getService("event");
          eventValue = eventService["event"]
          if eventValue:
            self.step = -1
          else:
            self.step = 1

        def publish(self, pythonUtils, serviceName):
          publishService = pythonUtils.getService("published");
          pythonUtils.setValue(publishService, "value", self.count)
          self.count = self.count + self.step
          pythonUtils.send("published")
See also
- First tutorial: The first tutorial present the coding and configuration of a very simple system with two modules
- Second python tutorial: The second Python tutorial is based on the first Python tutorial, but with one start method
- Tutorials: This tutorial reuse the first tutorial, but the two modules are in two different framework instances
×
![]()
Categories: tutorials