Home
Categories
Dictionary
Glossary
Download
Project Details
Changes Log
What Links Here
FAQ
License
Map widget tutorial
1 Overview
2 Architecture
3 Specifying the Definition File
4 Developing the User Application
4.1 Initializing the code structure
4.2 Setting the MapHorz characteristics
4.3 Add the event handlers on the buttons
4.4 Code the rotateMap button
4.5 Code the send button
4.5.1 Create the MapItemListRep
4.5.2 Add the items for the segment
4.5.3 Add the mid-point item for the segment
4.5.4 Add the other segments: creation of the ProjectionHelper
4.5.5 Add the other segments: compute p3
4.5.6 Add the other segments: compute p4
4.5.7 Add the other segments: compute pper
4.5.8 Add the other segments: create the list of segments
4.5.9 Add the other segments: set the mapItems buffer content
5 Notes
6 See also
In this tutorial, we will learn about developing a UA which will manage a MapHorz widget.
We will have a very simple A661_MAPHORZ widget with only one A661_MAPHORZ_ITEMLIST widget child for the MapItems:
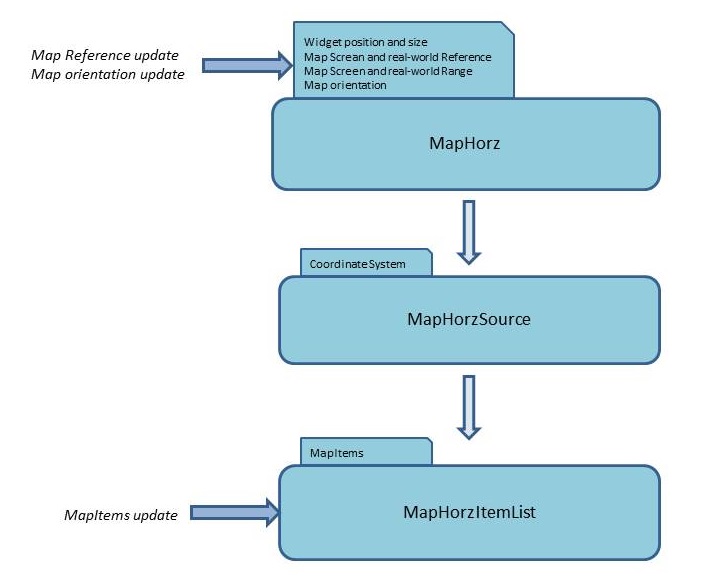
The architecture will be very simple:
The code is very simple:
To do that, we will need to create the helper, because we will need to use this class to compute the real-world position of the associated
Now we can add the associated Symbol:
We will have a very simple A661_MAPHORZ widget with only one A661_MAPHORZ_ITEMLIST widget child for the MapItems:
Overview
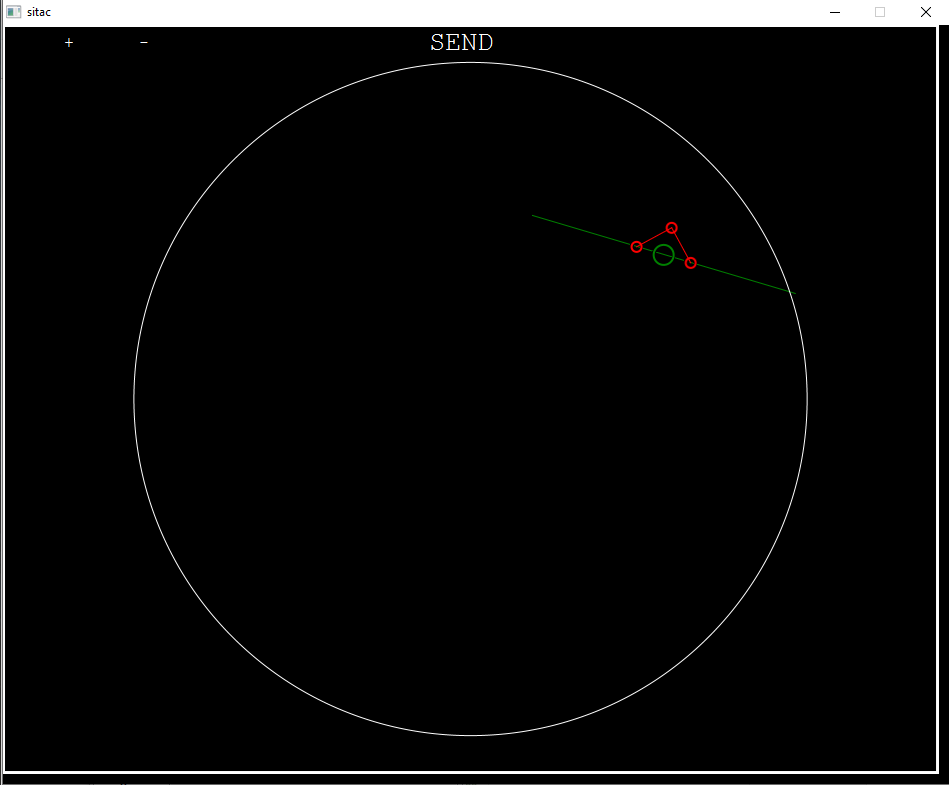
In this map widget, we will:- Add a line with one A661_LINE_START and one A661_LINE_SEGMENT MapItem
- Compute the center of the line and show a A661_SYMBOL_GENERIC at this position
- Use the UA ProjectionHelper to create two small segments with a relative position defined in 100th of mm relative to the center of the line
Architecture
For the sake of this tutorial, our architecture will only have one module with no service connection. We will use a button on the ARINC 661 interface to send the MapItems buffer to the Server.The architecture will be very simple:
      <applications>
         <application name="uaappli">
            <deployment>
               <lib url="UAApplication.jar" />
               <lib url="UAAppliHelper.jar" />
            </deployment>
            <modules>
               <module name="uaappli"/>
            </modules>
         </application>
      </applications>
As for the first A tutorial, we will define our UA configuration using the uaImpl and uaPath properties:
      <properties>
         <application name="uaappli" >
            <module name="uaappli" >
               <moduleProperty key="uaImpl" value="UAMapTutorial.jar" />
               <moduleProperty key="uaPath" value="org.da.protoframework.tutorialMap.uaappli.UATutorial" />
               <moduleProperty key="a661Config" value="a661/tutorial.properties" />
               <moduleProperty key="includeServer" value="true" />
            </module>
         </application>
      </properties>
We don't need any services or types, which means that our filelist configuration will be very basic:
      <files>
         <file url="applications.xml" />
         <file url="properties.xml" />
      </files>
Specifying the Definition File
The Definition File will contain:- One MapHorz widget, its MapHorzSource child, and the MapHorzItemList child of the MapHorzSource
- One "SEND" Button to send the MapItems buffer
- Two "-" and "+" buttons to change the orientation of the MapHorz
Developing the User Application
Now we will develop our User Application:- The
connected()method will be used to add the listeners which will listen to the click on buittons, and to initialize the characteristics of the Map - The effective setting of the MapItem buffer content will be set when clicking on the "SEND" button
Initializing the code structure
The code structure of our User Application is very simple:- The
connected()method will be used to initialize the event handlers on the buttons, and to set the MapHorz characteristics
      public class UATutorial3 extends AbstractFunctionalUA {
         public UATutorial3() {
         }

         @Override
         public void connected() {
         }
      }
Setting the MapHorz characteristics
The MapHorz widget has Design-time properties for the Range and Orientation, so we don't need to set them in our example. But the world coordinates of the reference of the Map need to be set at runtime:public class UATutorial3 extends AbstractFunctionalUA { private static final double PRP_LAT = 44.65; private static final double PRP_LON = 4.73; public void connected() { this.initEventHandlers(); runtimeAPIHelper.setA661WidgetParameterFromName("maphorz", "ProjectionReferencePointLatitude", PRP_LAT); runtimeAPIHelper.setA661WidgetParameterFromName("maphorz", "ProjectionReferencePointLongitude", PRP_LON); } private void initEventHandlers() { } }Note that for now we have an empty
initEventHandlers() method but we will code it in the next step.
Add the event handlers on the buttons
We will now add the event handlers on the buttons:- The "SEND" Button will be used to construct and send the MapItems buffer
- The "-" and "+" buttons will be used to change the orientation of the MapHorz
      private void initEventHandlers() {
         // listen to send button
         runtimeAPIHelper.addA661WidgetEventListener("SendButton", new ARINCEventListener() {
           public void eventReceived(ARINCEvent evt) {
             try {
               send();
             } catch (ARINCRuntimeException ex) {
               logger.error(module, ex.getMessage());
             }
           }
         });

         // listen to rotation buttons
         runtimeAPIHelper.addA661WidgetEventListener("RotateMoins", new ARINCEventListener() {
           public void eventReceived(ARINCEvent evt) {
             try {
               rotateMap(-10);
             } catch (ARINCRuntimeException ex) {
               logger.error(module, ex.getMessage());
             }
           }
         });
         runtimeAPIHelper.addA661WidgetEventListener("RotatePlus", new ARINCEventListener() {
           public void eventReceived(ARINCEvent evt) {
             try {
               rotateMap(10);
             } catch (ARINCRuntimeException ex) {
               logger.error(module, ex.getMessage());
             }
           }
         });
      }

      private void rotateMap(double orientation) {
      }

      private void send() {
      }
For now the
send() and rotateMap(double) methods are emtpy but we will code it in the next step.
Code the rotateMap button
The only thing we need to do is set the orientation of the MapHorz:public class UATutorial3 extends AbstractFunctionalUA { private static final double PRP_LAT = 44.65; private static final double PRP_LON = 4.73; private double orientation; private void rotateMap(double orientation) { double _orientation = this.orientation + orientation; _orientation = UnitsConverter.convert(_orientation, Units.DEG, Units.DEG360); this.orientation = _orientation; runtimeAPIHelper.setA661WidgetParameterFromName("maphorz", "Orientation", _orientation); api.sendAll(); } }
Code the send button
This method will be used to create the Buffer for the MapItems.Create the MapItemListRep
First we will create a MapItemListRep is a representation of a MapItemList widget which will be used to send Buffer of MapItems to the CDS. We need to create it with our MapItemList[1]
The widget name is
:MapItemspublic class UATutorial3 extends AbstractFunctionalUA { private static final double PRP_LAT = 44.65; private static final double PRP_LON = 4.73; private MapItemListRep mapItemsRep; public void connected() { this.initEventHandlers(); runtimeAPIHelper.setA661WidgetParameterFromName("maphorz", "ProjectionReferencePointLatitude", PRP_LAT); runtimeAPIHelper.setA661WidgetParameterFromName("maphorz", "ProjectionReferencePointLongitude", PRP_LON); _ mapItemsRep = runtimeAPIHelper.addMapItemListRep("MapItems"); } }
Add the items for the segment
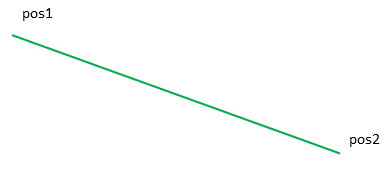
To show the line segment, we need to have two MapItems:- A A661_LINE_START for the start of the line
- A A661_LINE_SEGMENT for the first point (and end) and the line
      private void send() {
         MapPosition pos1 = new MapPosition.Double(45.13, 4.96, Units.DEG360);
         MapPosition pos2 = new MapPosition.Double(44.92, 5.93, Units.DEG360);

         ItemMap item = mapItemsRep.addItem(1, "A661_LINE_START");
         item.addProperty("X", pos1.getFirstCoordDouble());
         item.addProperty("Y", pos1.getSecondCoordDouble());

         item = mapItemsRep.addItem(2, "A661_LINE_SEGMENT");
         item.addProperty("X", pos2.getFirstCoordDouble());
         item.addProperty("Y", pos2.getSecondCoordDouble());
         item.addProperty("EndFlag", true);
      }
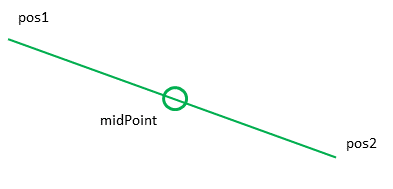
Add the mid-point item for the segment
We will create a A661_SYMBOL_GENERIC to show the mid-point of the two points.
The code is very simple:
      private void send() {
         ...
         double midPointX = pos1.getFirstCoordDouble() + (pos2.getFirstCoordDouble() - pos1.getFirstCoordDouble())/2;
         double midPointY = pos1.getSecondCoordDouble() + (pos2.getSecondCoordDouble() - pos1.getSecondCoordDouble())/2;
         MapPosition midPoint = new MapPosition.Double(midPointX, midPointY, Units.DEG360);
         item = mapItemsRep.addItem(3, "A661_SYMBOL_GENERIC");
         item.addProperty("X", midPoint.getFirstCoordDouble());
         item.addProperty("Y", midPoint.getSecondCoordDouble());
         item.addProperty("SymbolType", 0);
      }
Add the other segments: creation of the ProjectionHelper
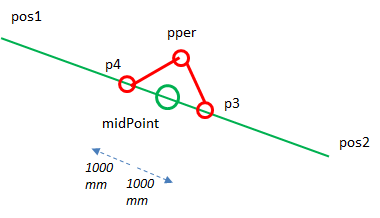
To show the usage of the UA ProjectionHelper, we will show two other segments:- The first one is a small segment specified in 1/100th of mm from a point perpendicular to the mid-point (
pper) to a point in the direction of the second point (p3) - The second one is a small segment specified in 1/100th of mm from the point perpendicular to the mid-point (
pper) to a point in the direction of the first point (p4)
To do that, we will need to create the helper, because we will need to use this class to compute the real-world position of the associated
pper, p3, and p4 points:public class UATutorial3 extends AbstractFunctionalUA { private static final double PRP_LAT = 44.65; private static final double PRP_LON = 4.73; private static final double Z2D_CIRCLE_SCREEN_RANGE = 9000; private MapItemListRep mapItemsRep; private final ProjectionHelper projHelper = new ProjectionHelper(); public void connected() { this.initEventHandlers(); runtimeAPIHelper.setA661WidgetParameterFromName("maphorz", "ProjectionReferencePointLatitude", PRP_LAT); runtimeAPIHelper.setA661WidgetParameterFromName("maphorz", "ProjectionReferencePointLongitude", PRP_LON); _ mapItemsRep = runtimeAPIHelper.addMapItemListRep("MapItems"); projHelper.setPRP(PRP_LAT, PRP_LON); // set the same reference in the ProjectionHelper as in the MapHorz projHelper.setRange(40, Z2D_CIRCLE_SCREEN_RANGE); // set the same range in the ProjectionHelper as in the MapHorz } }
Add the other segments: compute p3
We will use the value 1000 (1/100th of mm) for the distance between all these points:public class UATutorial3 extends AbstractFunctionalUA { private static final double PRP_LAT = 44.65; private static final double PRP_LON = 4.73; private static final double Z2D_CIRCLE_SCREEN_RANGE = 9000; private MapItemListRep mapItemsRep; private static final long DISTANCEMM = 1000; }To compute the position of
p3, we need to compute a position between the mid-point to a point at the fistance of 1000 1/100 mm in the bearing of the segment between pos1 and pos2:private void send() { ... // compute the bearing of the segment double bearing = projHelper.getBearingFromLatLong(pos1, pos2, Units.DEG360); // create a point from the mid-point to point 2, with bearing MapPosition p3 = projHelper.getLatLongPositionFromMM(midPoint, DISTANCEMM, bearing, Units.DEG360); }Now we can add the associated Symbol:
      private void send() {
         ...

         // to have a different color for the next MapItems
         item = mapItemsRep.addItem(4, "A661_ITEM_STYLE");
         item.addProperty("ItemStyleSet", 1);

         item = mapItemsRep.addItem(5, "A661_SYMBOL_GENERIC");
         item.addProperty("X", p3.getFirstCoordDouble());
         item.addProperty("Y", p3.getSecondCoordDouble());
         item.addProperty("SymbolType", 1); // the value 1 is to have a smaller size for the circle
      }
Add the other segments: compute p4
To compute the position ofp4, we do the same as p3, except the we go in the opposite direction:private void send() { ... // create a point from the mid-point to point 2, with bearing MapPosition p4 = projHelper.getLatLongPositionFromMM(midPoint, DISTANCEMM, bearing + 180, Units.DEG360); }Now we can add the associated Symbol:
      private void send() {
         ...

         item = mapItemsRep.addItem(6, "A661_SYMBOL_GENERIC");
         item.addProperty("X", p4.getFirstCoordDouble());
         item.addProperty("Y", p4.getSecondCoordDouble());
         item.addProperty("SymbolType", 1);
      }
Add the other segments: compute pper
pper is a point perpendicular to the segment from the mid-point. private void send() { ... MapPosition pper = projHelper.getLatLongPositionFromMM(midPoint, DISTANCEMM, bearing + 90, Units.DEG360); }
Now we can add the associated Symbol:
      private void send() {
         ...

         item = mapItemsRep.addItem(7, "A661_SYMBOL_GENERIC");
         item.addProperty("X", pper.getFirstCoordDouble());
         item.addProperty("Y", pper.getSecondCoordDouble());
         item.addProperty("SymbolType", 1);
      }
Add the other segments: create the list of segments
Now we will create a list of segments fromp4 to pper to p3:private void send() { ... item = mapItemsRep.addItem(8, "A661_LINE_START"); item.addProperty("X", p4.getFirstCoordDouble()); item.addProperty("Y", p4.getSecondCoordDouble()); item = mapItemsRep.addItem(9, "A661_LINE_SEGMENT"); item.addProperty("X", pper.getFirstCoordDouble()); item.addProperty("Y", pper.getSecondCoordDouble()); item = mapItemsRep.addItem(10, "A661_LINE_SEGMENT"); item.addProperty("X", p3.getFirstCoordDouble()); item.addProperty("Y", p3.getSecondCoordDouble()); item.addProperty("EndFlag", true); }
Add the other segments: set the mapItems buffer content
      private void send() {
         ...

         mapItemsRep.setBufferContent();
      }
Notes
- ^ The widget name is
MapItems
See also
- Built-in Applications: This article present the built-in Applications distributed with the framework
- UA application: The built-in UA application allows to execute an ARINC 661 Client
- Developing a UA: This article explains how to develop a User Application
- Functional UA runtime API: This article explains how to use the methods in the Functional UA which simplify the usage of the ARINC 661 API
- UA ProjectionHelper: This article explains how the User Application ProjectionHelper works
×
![]()
Categories: builtin-applis | tutorials | uaappli